
A blog about Ubuntu and linux in general as well as other technology and computer related issues.
Showing posts with label ubuntu. Show all posts
Showing posts with label ubuntu. Show all posts
Wednesday, January 15, 2014

Tuesday, January 7, 2014
nvidia fix
I had this same problem just a few hours ago, the latest 331 is broken. Downgrading to the previous driver or any other, included the open-source nouveau won't work, the only solution is uninstall all nvidia packages and install the driver from the .run you can download from the nvidia website.
There, select your graphic card, architecture, etc, and download the installer. When it's done, you'll need to install it from the commandline without X running. Pres Ctrl+Alt+F6 and after login:
Now, asuming your driver has been downloaded to the "Downloads" folder:
I've used the asterisk here because I can't know if the driver you downloaded is the exact same name as mine, since it depends on your GPU. You could use autocompletion with the tab key to use the exact .run name.
Follow the on screen instructions. When you finish, reboot:
If after rebooting you see the same problem, log again in a TTY and try:
This should regenerate a new /etc/X11/xorg.conf
Just a quick update for anyone who used my solution: Today a new update of some gl libraries has broken my system again. I've had to re-install the NVIDIA run package, it complained about some of its libraries being altered and restored them to its working state. There seems to be a compatibility problem between libraries from the official repositories and the ones packaged in the driver. This is the reason I don't like to install things from outside packagers... To reinstall the driver, kill the X with
and reinstall the .run with
| |||

nvidia ubuntu 13.10
Before you install the driver you have to do the following actions:
sudo apt-get install linux-source
sudo apt-get install linux-headers-$(uname -r)
The important thing is that you first blacklist the nouveau driver:
A simple way to prevent Nouveau from loading and performing a kernel modeset is to add configuration directives for the module loader to a file in /etc/modprobe.d/. These configuration directives can technically be added to any file in /etc/modprobe.d/, but many of the existing files in that directory are provided and maintained by your distributor, which may from time to time provide updated configuration files which could conflict with your changes. Therefore, it is recommended to create a new file, for example, /etc/modprobe.d/disable-nouveau.conf, rather than editing one of the existing files, such as the popular /etc/modprobe.d/blacklist.conf. Note that some module loaders will only look for configuration directives in files whose names end with .conf, so if you are creating a new file, make sure its name ends with .conf.
Whether you choose to create a new file (It's my preferred configuration) or edit an existing one, the following two lines will need to be added:
blacklist nouveau
options nouveau modeset=0
Then you install the nvidia driver with your prefered configuration ( x-swat, nvidia of the distributed drivers from Ubuntu).
http://ubuntuforums.org/showthread.php?t=2181525
sudo apt-get install linux-source
sudo apt-get install linux-headers-$(uname -r)
The important thing is that you first blacklist the nouveau driver:
A simple way to prevent Nouveau from loading and performing a kernel modeset is to add configuration directives for the module loader to a file in /etc/modprobe.d/. These configuration directives can technically be added to any file in /etc/modprobe.d/, but many of the existing files in that directory are provided and maintained by your distributor, which may from time to time provide updated configuration files which could conflict with your changes. Therefore, it is recommended to create a new file, for example, /etc/modprobe.d/disable-nouveau.conf, rather than editing one of the existing files, such as the popular /etc/modprobe.d/blacklist.conf. Note that some module loaders will only look for configuration directives in files whose names end with .conf, so if you are creating a new file, make sure its name ends with .conf.
Whether you choose to create a new file (It's my preferred configuration) or edit an existing one, the following two lines will need to be added:
blacklist nouveau
options nouveau modeset=0
Then you install the nvidia driver with your prefered configuration ( x-swat, nvidia of the distributed drivers from Ubuntu).
http://ubuntuforums.org/showthread.php?t=2181525
Friday, August 9, 2013
ubuntu 13.04 on low end machines
I'll add two more tips to
that. Switch Unity to llvmpipe rendering (low graphics mode) which does
more than all other tips combined. Lower the OpenGL rendering quality.
Here's a complete Unity speed-tweak-list for reference:
Here's a complete Unity speed-tweak-list for reference:
- install compizconfig-settings-manager and run it
- in the OpenGL-plugin set the rendering quality to fast
- disable the Animations and Fading Windows Plugins completely
- In the Window Decoration plugin set all shadow values to 0 (or minimal value)
- enable llvmpipe rendering by running this command
echo "export UNITY_LOW_GFX_MODE=1" | sudo tee /etc/X11/Xsession.d/99force-llvm
- reboot.
Saturday, April 27, 2013
Install Google Chrome in Ubuntu 13.04 [SOLVED]
1. Open a terminal window.
2. Type in the following commands then hit Enter after each for the 32 bit version of Chrome.
wget -O libudev0_175-i386_NoobsLab.com.deb http://goo.gl/8hrxx
sudo dpkg -i libudev0_175-i386_NoobsLab.com.deb
sudo apt-get install libgconf2-4 libxss1
wget -O g-chrome-NoobsLab32.deb https://dl.google.com/linux/direct/google-chrome-stable_current_i386.deb
sudo dpkg -i g-chrome-NoobsLab32.deb && rm g-chrome-NoobsLab32.deb
3. Type in the following commands then hit Enter after each for the 64 bit version of Chrome.
wget -O libudev0_175-amd64_NoobsLab.com.deb http://goo.gl/JJukQ
sudo dpkg -i libudev0_175-amd64_NoobsLab.com.deb
sudo apt-get install libgconf2-4 libxss1
wget -O g-chrome-NoobsLab64.deb https://dl.google.com/linux/direct/google-chrome-stable_current_amd64.deb
sudo dpkg -i g-chrome-NoobsLab64.deb && rm g-chrome-NoobsLab64.deb
For more, see the original article at the link below.

2. Type in the following commands then hit Enter after each for the 32 bit version of Chrome.
wget -O libudev0_175-i386_NoobsLab.com.deb http://goo.gl/8hrxx
sudo dpkg -i libudev0_175-i386_NoobsLab.com.deb
sudo apt-get install libgconf2-4 libxss1
wget -O g-chrome-NoobsLab32.deb https://dl.google.com/linux/direct/google-chrome-stable_current_i386.deb
sudo dpkg -i g-chrome-NoobsLab32.deb && rm g-chrome-NoobsLab32.deb
3. Type in the following commands then hit Enter after each for the 64 bit version of Chrome.
wget -O libudev0_175-amd64_NoobsLab.com.deb http://goo.gl/JJukQ
sudo dpkg -i libudev0_175-amd64_NoobsLab.com.deb
sudo apt-get install libgconf2-4 libxss1
wget -O g-chrome-NoobsLab64.deb https://dl.google.com/linux/direct/google-chrome-stable_current_amd64.deb
sudo dpkg -i g-chrome-NoobsLab64.deb && rm g-chrome-NoobsLab64.deb
For more, see the original article at the link below.
Skype Crashes after Installing Ubuntu 13.04 [SOLVED]
PROVED TO BREAK THE SYSTEM IF YOU HAVE THE NVIDIA DRIVERS ENABLED!
After upgrading from Ubuntu 12.10 to 13.04 I have installed skype. But it crashes time to time. What can I do to solve this problem?
You can also do the following way ...
copy and paste the following line in it
and then run
Done
http://askubuntu.com/questions/286005/skype-crashes-after-installing-ubuntu-13-04
After upgrading from Ubuntu 12.10 to 13.04 I have installed skype. But it crashes time to time. What can I do to solve this problem?
You can also do the following way ...
sudo gedit /etc/ld.so.conf.d/skype.conf
copy and paste the following line in it
/usr/lib/i386-linux-gnu/mesa/
and then run
sudo ldconfig -v
Done
http://askubuntu.com/questions/286005/skype-crashes-after-installing-ubuntu-13-04
Monday, April 1, 2013
“The following packages have been kept back:” Why and how do I solve it?
according to an article on debian-administration.org,
If the dependencies have changed on one of the packages you have installed so that a new package must be installed to perform the upgrade then that will be listed as "kept-back".
That article says
sudo apt-get dist-upgrade will force the installation of those newer packages.Note:
dist-upgrade will install all pending updates, with their new dependencies. If for some reason, you don't want to do that, you should use apt-get install package-name dependency-package-nameinstead.Use TMPFS To Reduce Disk I/O
The /tmp folder receives a lot of hard disk read/write operations. You can simply use your system RAM instead of your hard disk to speed up read/write operations for the /tmp folder. To do this, you can follow these instructions:
- Open the terminal and edit the /etc/fstab file with this command:
sudo gedit /etc/fstab
or
sudo pluma /etc/fstab
- At the end of the file, add these two lines:
# Move /tmp to RAM
tmpfs /tmp tmpfs defaults,noexec,nosuid 0 0
Save your file and exit. Restart now your system to apply the new changes.
http://www.upubuntu.com/2012/06/11-tips-to-speed-up-computers-running.html
- Open the terminal and edit the /etc/fstab file with this command:
sudo gedit /etc/fstab
or
sudo pluma /etc/fstab
- At the end of the file, add these two lines:
# Move /tmp to RAM
tmpfs /tmp tmpfs defaults,noexec,nosuid 0 0
Save your file and exit. Restart now your system to apply the new changes.
http://www.upubuntu.com/2012/06/11-tips-to-speed-up-computers-running.html
RAM as Storage For the /tmp Directory: Make Ubuntu even faster!
Target audience
This tip is aimed at Linux users with 4GB or more ram. Those with less can also use this but they should reduce the amount of ram allocated.
Disclaimer
This tip involves messing around with a system file. If it goes wrong you could render your computer un-bootable. This is nothing that a live CD can’t fix.
Here we go
Edit the file /etc/fstab you can allocate some of your ram to the /tmp file system. This is down to the rather wonderful in memory file system tmpfs.
sudo nano /etc/fstab
Add the following to the end of the file to allocate 1/2 Gigabyte ram to your /tmp.
tmpfs /tmp tmpfs size=512m 0 0
Then simply run the command
sudo mount -a
If your distro does not use sudo then su to root instead. This gives a nice little speed boost.
ZRAM: Make Ubuntu ultra-fast
There is now a package available in the official Ubuntu 12.04 and newer repositories. Install it using:
sudo apt-get install zram-config
The service daemon will activate instantly upon install. You can verify this by typing in a terminal:
cat /proc/swaps
There should be some /dev/XXX entry (given you have a swap partition/file active) and two entries with "swap" in their name. If not, try rebooting and type in the command again.
There are no further actions neccessary.
Like Sergey "Shnatsel" Davidoff was quoted in that blog post, this package installs a script to run it as a service. The script automatically configures itself and the service starts up automatically. There is no further configuration needed. The service can be manually controlled via:
sudo service zramswap start|stop|status|restart|reload|force-reload
If you open the deb package with file roller you can see that only two files are installed:
/etc/init/zramswap.conf
/etc/init.d/zramswap
Along with some documentation files. The
DEBIAN directory contains package meta data and commands to initialize the service. Thats all there is in the package. The corresponding devices are named after this scheme: /dev/zram[0-9]Make sure to reboot Ubuntu and check if Zram started during boot. Follow the instructions as noted earlier to check by cat /proc/swaps
If you don't see your zram swap devices listed, (in my case too) then do this :
sudo su
update-rc.d zramswap defaults
This will list zram as a startup service...
To remove [type the following]:
http://askubuntu.com/questions/174579/how-do-i-use-zramsudo dpkg --purge zramswap-enabler sudo dpkg --purge zram-config
Monday, March 25, 2013
How can I install moonlight for Chrome in Ubuntu? (Answered)
Steps to install Moonlight
Download the .crx file from here
Drag and drop the downloaded novell-moonlight-3.99.0.3-i586.crx file into Google chrome browser.
If you get any error mentioning "Apps extensions and user scripts cannot be added from this website"
open chrome://chrome/extensions/ in a new tab and now repeat the step 2
Hope this helps.
p.s. Take a look at the Moonlight project page http://www.go-mono.com/moonlight/download.aspx http://askubuntu.com/questions/235532/how-can-i-install-moonlight-for-chrome-in-12-04
Download the .crx file from here
Drag and drop the downloaded novell-moonlight-3.99.0.3-i586.crx file into Google chrome browser.
If you get any error mentioning "Apps extensions and user scripts cannot be added from this website"
open chrome://chrome/extensions/ in a new tab and now repeat the step 2
Hope this helps.
p.s. Take a look at the Moonlight project page http://www.go-mono.com/moonlight/download.aspx http://askubuntu.com/questions/235532/how-can-i-install-moonlight-for-chrome-in-12-04
Tuesday, February 12, 2013
Compression/Decompression tool
Install Compression/Decompression tools:
You can compress and decompress 7z, zip, gzip, rar, xz, tar, bz2, xar, tar.gz, tar.bz, and many others.
Enter following command in terminal to install:
http://www.noobslab.com/2012/10/important-thingstweaks-to-do-after.html
You can compress and decompress 7z, zip, gzip, rar, xz, tar, bz2, xar, tar.gz, tar.bz, and many others.
Enter following command in terminal to install:
http://www.noobslab.com/2012/10/important-thingstweaks-to-do-after.html
Window-List Indicator (ubuntu 12.10)
Install Window-List Indicator:
This Window-List indicator show which windows are currently open, and you can easily switch between them.
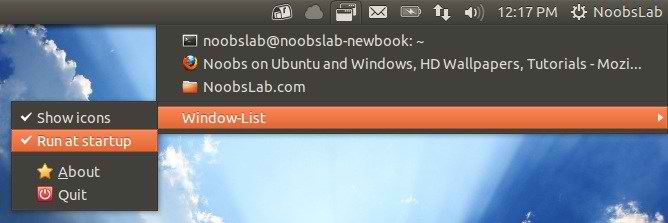 Enter following commands in terminal:
After installation go to Dash and search "Window-List" then open it. Make it startup from Window-List option.
http://www.noobslab.com/2012/10/important-thingstweaks-to-do-after.html
This Window-List indicator show which windows are currently open, and you can easily switch between them.
After installation go to Dash and search "Window-List" then open it. Make it startup from Window-List option.
http://www.noobslab.com/2012/10/important-thingstweaks-to-do-after.html
Disable System Crash Reports (Ubuntu 12.10)
Disable System Crash Reports:
If you are experiencing something crashes in your Ubuntu, and you don't like to notify with reports. You can disable them easily.
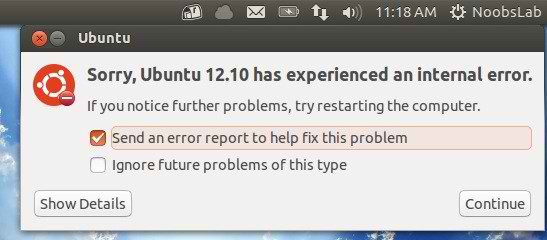 Enter following commands to disable crash reports:
Now text file will open, In the last line you will see "enabled=1" change it to "enabled=0". Save and close file.
Now enter following command in terminal to stop apport service:
http://www.noobslab.com/2012/10/important-thingstweaks-to-do-after.html
If you are experiencing something crashes in your Ubuntu, and you don't like to notify with reports. You can disable them easily.
Now text file will open, In the last line you will see "enabled=1" change it to "enabled=0". Save and close file.
Now enter following command in terminal to stop apport service:
http://www.noobslab.com/2012/10/important-thingstweaks-to-do-after.html
Disable overlay Scrollbars in Unity (Ubuntu 12.10)
Disable overlay Scrollbars:
You can disable overlay scrollbars, if you don't like that.
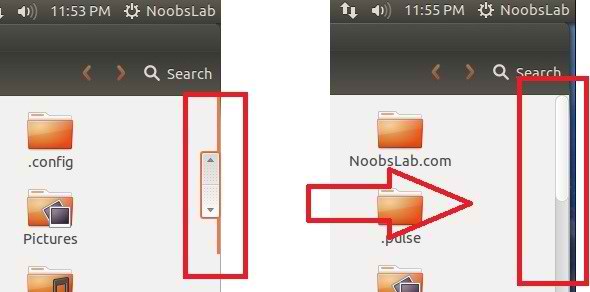 Enter following command in terminal to disable overlay scrollbar:
If you want to get back overlay bar, enter following command:
http://www.noobslab.com/2012/10/important-thingstweaks-to-do-after.html
You can disable overlay scrollbars, if you don't like that.
If you want to get back overlay bar, enter following command:
How to set MS Word 2010 as default application for all docx and other types?
Solution
Visit: http://ubuntuforums.org/showthread.php?t=1940522
BY: forrestcupp
Preface: This is a howto, not a question.
Today, after beating my brains out trying to install Office 2007 with Wine 1.4 in Precise, I ended up resorting to using PlayOnLinux. What I learned about PlayOnLinux is that it makes installing things a dream, but it makes the general usability of those things an absolute nightmare. When I had Office 2007 installed with Wine, I could easily set filetype associations in Nautilus to Word and Excel. When I installed Office 2007 in PlayOnLinux, it didn't leave any way to associate filetypes. Also, PlayOnLinux created nice shortcuts to the apps on the desktop, but it didn't create any gnome-desktop launchers that will show up in Dash in Unity or Gnome Shell.
After a lot of hard work and headaches, I finally figured out how to do both of those things, so I thought I would share that experience for future reference, and for anyone else who might need it.
When you are preparing to do this, be aware that you will have to create two separate .desktop files for each Office program (Word, Excel, etc.). The first section creates a .desktop file so that a new instance of Word can be launched from the Dash. The second section creates a second .desktop file for associating file types.
Creating a .desktop launcher file
This creates a .desktop file so that a new instance your Office programs can be launched from Dash.
Open a terminal, and enter this command: Code:
gnome-desktop-item-edit ~/.local/share/applications/ --create-new
In the window that comes up, first enter a name for your launcher. For Microsoft Word, we'll enter Microsoft Word as the name. Then in the "Command" box, for Word 2007, we'll enter this code Code:
playonlinux --run "Microsoft Word 2007"
For Excel 2007, you would enter "Microsoft Excel 2007" leaving the quotes in it. For anything else, you just would put whatever app name shows up in the PlayOnLinux window, and put that name in quotes. After this, you can click on the icon and use the file browser to point it to whatever icon you want to use for that launcher.
After doing this, your app launcher should show up by doing a Dash search.
Associating files with MS Office that was installed with PlayOnLinux
This creates a second .desktop file for associating your file types.
Step 1 - creating a .desktop launcher for association Since PlayOnLinux installed apps don't show up in the "Open With" dialog in Nautilus, you have to create a custom command for Nautilus. This used to be easy to do with the GUI, but since they changed to Gnome 3 in 11.10, you can't do that anymore. Never fear, that's why we have the command line. Open a terminal, and cd to a folder that has a .doc or .docx file. Once you're in that folder, note the name of your Word document file, and type: Code:
mimeopen -d filename.doc
Of course you would type .docx if that's what type of file it is. When you type this, it will give you options of what you want the default app to be for that file. Enter whatever number says "Other" so that you can enter a custom command. For that custom command, enter the following for Word 2007: Code:
playonlinux --run "Microsoft Word 2007" z:%f
Note, that it will try to open the file with Word, and at this point it will not work. By the time you're done, it will work properly when you double click it in Nautilus.
Now open up Nautilus, press Ctrl+H if hidden files aren't showing, and navigate to ~/.local/share/applications and find the .desktop launcher file with something like "playonlinux_userdefined" in the name. Change that name to something like Word.desktop. Now you can right-click on a .doc or .docx file, go to Properties, and go to the "Open With" tab, click "Show Other Applications" and find "Word.desktop" in the list. Now, that filetype is associated with Word, and you can go through all of those steps again substituting the right names for Excel and Powerpoint.
Step 2 - making it work properly Unfortunately, what you just did won't work if there are spaces in the file or folder names. But we can fix that, too.
Open Nautilus and navigate to ~/.PlayOnLinux/shortcuts. Double click on each of the shortcuts that were made for Word, Excel, and Powerpoint, and choose to Display the file in Gedit. At the end of the script, you should find this code: Code:
$@
Change that code for the following code in each shortcut script, and save the files. Code:
"$(echo "$@" | sed -e 's:/*/:\:g')"
Make sure you leave the quotes in. That code will take the path and filename and convert any spaces to be readable by Word, Excel, or Powerpoint when you open the file.
Since both desktop files will show up in a Dash search, I suggest not assigning an icon to this one to prevent confusion.
Now, you should be able to navigate to any MS Office file in Nautilus, double click on it, and it will open properly.
I'm not an expert, and this is just the findings of my experience. Hopefully it works for you, too.
Edit: I found all of this information scattered all over the net, but I need to give credit to wojox for helping me fix a problem with the bash code I found for the shortcut script.
Monday, October 15, 2012
peed Up Computers Running Ubuntu
10 Tips To Speed Up Computers Running Ubuntu 12.04/Linux Mint 13 (Maya)
 In this guide, I will try to introduce 11 tips that can be useful for those having old computers with low RAM and want to speed up their system for better performance. These tips are workable under Ubuntu 12.04 or older and any other Ubuntu-based system (Linux Mint 13, for example). If you have more tips, you can mention them in the comment form given below.
1. Preload
Preload is a daemon that runs in the background (invisible) that detects most used applications and store them in cache so that they can be called quickly, which will result in quick system load time. To install it on Ubuntu 12.04/Linux Mint 13, run this command:
sudo apt-get install preload
The default settings for Preload are enough, but if you want to use your own configuration, you can edit this file:
sudo gedit /etc/preload.conf
For Linux Mint, edit the file as follows:
sudo pluma /etc/preload.conf
To monitor preload's log file, run this command:
sudo tail -f /var/log/preload.log
2. Clean Up APT Cache
You need to clean up not needed apt sources from time to time with this command:
sudo apt-get autoclean
3. Disabling Unnecessary Startup Applications
- There are many applications that are configured to start automatically as the system starts. You can manage these applications by opening Startup Application from the Unity dash under Ubuntu 12.04:

For Linux Mint, the window will look like this:

Check off not needed applications (Bluetooth, Desktop sharing, WiFi, etc.) from the given list with careful attention to some applications that are needed for your system to start.
- You can also use BUM (Boot Up Manager) to disable unnecessary services and applications. You can install it with this command:
sudo apt-get install bum
4. Adjust Swappiness
To check your current used Swappiness, run this command:
cat /proc/sys/vm/swappiness
The default value is 60, to change it, edit this file:
sudo gedit /etc/sysctl.conf
For Linux Mint:
sudo pluma /etc/sysctl.conf
Search for this line (if not present, just add it):
vm.swappiness=10
Save your file and exit. Changes will take effect once you reboot your system.
5. Disable Hibernation/Sleep Functions (Not Recommended)
If you don't need to hibernate (sleep mode) your system, you can disable it as follows at your own risk:
- Edit this file with this command:
sudo gedit /etc/initramfs-tools/conf.d/resume
- For Linux Mint:
sudo pluma /etc/initramfs-tools/conf.d/resume
- Comment (add # at the beginning) now this line:
RESUME=UUID=****
- It should be like this:
#RESUME=UUID=***

- Save your file and reboot your system.
6. Speed Up Boot Time By Disabling The Grub Boot Menu
When starting your system, the screen will stop at the Grub2 boot menu. If you want to disable it, you can follow these instructions:
- Open the terminal and edit this file on Ubuntu 12.04:
sudo gedit /etc/default/grub
- For Linux Mint:
sudo pluma /etc/default/grub
- Search now for this line and set its value to zero:
GRUB_TIMEOUT=0

- Save the file and close it. The Grub2 boot menu will not show up in the next system rebooting, but you can call it by holding down the Shift key while rebooting.
7. Get Reliable Performance with ZRAM
If you have an old computer with low RAM, you can optimize it using ZRAM, which will create on your system a compressed block device that mimics a swap disk to reduce disk thrashing (aka paging). To install it under Ubuntu 12.04/LinuxMint 13, run this sequence of commands from the terminal:
sudo add-apt-repository ppa:shnatsel/zram
sudo apt-get update
sudo apt-get install zramswap-enabler
8. Use all CPU Cores For System Startup
If your computer is equipped with a multi-core CPU, you can configure your system to use all available cores during startup by following these instructions:
- Edit this file:
sudo gedit /etc/init.d/rc
- For Linux Mint:
sudo pluma /etc/init.d/rc
- Search now for the first instance of this line:
CONCURRENCY=none
- And replace it with this one if needed:
CONCURRENCY=makefile
Save your file and exit.
9. Disabling Visual Effects
If your computer is a bit old, you can get rid of unwanted visual effects using Compizconfig Settings Manager. To install it under Ubuntu 12.04, run this command:
sudo apt-get install compizconfig-settings-manager
Start it now and head to the Effects section, then disable all enabled effects:

10. Use TMPFS To Reduce Disk I/O
The /tmp folder receives a lot of hard disk read/write operations. You can simply use your system RAM instead of your hard disk to speed up read/write operations for the /tmp folder. To do this, you can follow these instructions:
- Open the terminal and edit the /etc/fstab file with this command:
sudo gedit /etc/fstab
or
sudo pluma /etc/fstab
- At the end of the file, add these two lines:
# Move /tmp to RAM
tmpfs /tmp tmpfs defaults,noexec,nosuid 0 0

Save your file and exit. Restart now your system to apply the new changes.
Subscribe to:
Posts (Atom)
-> Installing NVIDIA driver version 331.20. -> Running distribution scripts executing: '/usr/lib/nvidia/pre-install'... -> done. -> The distribution-provided pre-install script failed! Continue installation anyway? (Answer: No)– Patryk Jan 2 at 23:08